One of our favourite things to do as a group is eat. This was a stew with onions, beets, parsnips, carrots, lamb and herbs, made in the replica Mastermyr pot that Kettil made.
Here’s what the original looked like:
It was was 26 cm wide x 13.8 cm tall (handle not shown), found in Mastermyr, Gotland Sweden, and dated to circa 1150*. Source: The Mastermyr Find / Arwidsson & Berg, page 11, 29 - plate 11 / number 19d,
Revealed in the two cases above :
-
Several of the ingots were clearly made in the same top poured mould.
There was a distinctive knob feature seen, from a deeper cut to one end
of the mould.
- The arm rings were all considerably thicker in
cross section than I previously thought. (Exact L x W x H x weight is
rarely indicated.)
- Seeing the ingots and the arm rings side by
side certainly suggested that the arm rings were made by simply
hammering flat the ingots. The sizes of the bracelets was very uniform,
and the volume of metal from ingot into ring was very consistent.
- You also can see that all of the 'rings' are in fact flattened strips - not formed into C shapes at all.
This
might easily have been done to keep the package of silver small for
burial. That many of the bracelets have been deliberately turned over
and squished flat on one or both does suggest that all the silver,
worked or ingot, was only intended as silver weight.
Pair of fine silver hinged strap orniments - considered very unusual for VA finds
These large glass pieces were described as 'beads'
The large flattened disks were roughly 3 - 4 cm in diameter, with hole diameters approaching 1 cm.
The largest, to the lower right, was almost double even that mass of glass.
Taken together, this huge size suggests to me that these might easily have been intended as spindle whorls.
Not
everything from the Hord was on display. Especially most of the more
'unusual' objects (likely still under preservation work).
For more images - go to the Galloway Hord at the NMS
We have to raise £1.98 million to save the Hoard, and in addition we
need to raise additional funds to properly conserve, research and
prepare the Galloway Hoard for display, (NMS web site)
The Hoard was uncovered by a single individual, so it would fall under Scottish 'Treasure Trove' law.
It appears that although technically all such finds revert 'ownership'
to the Scottish Crown, in practice, an independant pannel determines a
'market value', which museums normally pay to the original finder.
Images : The National Museum of Scotland allows for full photography in all its galleries. All the images above were taken by myself on August 9, 2017 Although captured as photographs, the copyright to the text panels really rests with the NMS.
A recently recovered artifact is all the buzz in the Norse re-enactor's community.
It
is a three dimensional depiction of a woman, cast in silver. The bottom
of the figure has been broken off (thought to be plow damage from
working the field it was discovered in).
The Harby 'Valkyre' - click to see the published image size (!)
(Metal) Detectorist Morten Skovsby found the ... figurine late last year at Hårby on Funen, (Central Denmark)
Pulling a couple of the starting comments from the Norsefolk2 discussion group:
On 09/01/2013 04:24, Hilde wrote:
Hopefully, a high quality scan will be available some time in the future.
On Tue Jan 8, 2013 6:15 Charles wrote:
This is where the fun starts, now begins the search for archaeology to back up the outfit worn by the figure.
The need is there to make this more than an artistic representation.
The first rush was divided into to main topics:
1) Depiction of female with sword and shield - 'proof' of women in combat.
2) Deciphering details of the clothing.
There
is a gap between the falling hair and the back of the neck. Much was
being made of this : A pendant? Hung as a ritual object* ?
( Of course
since the bottom of the dress line is broken, we can not tell if the
piece was flat based to sit on a table, or might have once had details of the
feet.)
But before we go too far - Look at another
object from the Viking Age which has also been examined and argued about
in minute detail:
'Odin fra Lejre '
by Tom Christensen
1,75 cm høj, 1,98 cm bred og 1,25 cm dyb,
(high / wide/ deep ?)
(images and quote from Christensen's report)
The
recent 'discussion' has centred around the sex of the figure. One camp
sees a female, based on the length of the garment and seeing the dotted
bands on the chest as four rows of beads. The other camp sees the figure
as male, based on the band around the mouth seen as a moustache, and
the iconography of the thrown of O∂in.
Now - a reality check. Take a look at this image:
'Warrior' - click for detail
Look at all that detail on the figure's costume (or lack thereof)!
This is actually one of those 30 mm cast tin alloy miniatures so
many of us used for war game / Dungeons & Dragons playing 'back
in the day' (and still may do, for I know).
But before you start to attempt to determine all those fine details - Let's try something first:
All objects reduced to LIFE scale in these images.
It
has been my overwelming experience that no matter how much you work
with artifacts, you never really understand then until you see them in
life, actually before you. Reading the measurements does not really
impact you. Almost everything is either way SMALLER, or way LARGER in
actual truth, than what you imagine it is.
This is absolutely critical.
I have gotten into the habit now, for any object I have never actually seen
before me, to take the source image, scan / open it into Photoshop (or
the like). Then convert the image best as I can to the *actual* size
given for the object. I will often put a piece of blank graph paper into
my printer and print the life sized image on to that. This makes for
very easy conversions of details into physical measurements.
People
have been going a bit overboard (in my opinion, not so humble),
attempting to derive the finest detail from the published images of the
objects. Yes, it can be a wonderful tool to take a very high resolution
photograph, then look at that expanded version.
But what about the ancient artist who made the original object in the first place?
How small a thing was he really making?
What limits on detail were imposed by the medium he was working in?
Or by the tools he had available to work with?
Are you really looking at intended details of a reality?
Or is all this combined through an artistic style?
Let me
tell you, as someone who has actually worked with lost wax casting
techniques, there is very much a limit on just how much detail you can
physically place on any object that is as small as these pieces are!
* "Ritual Object'
Archaeological short hand for : 'We don't know what the heck this is for'
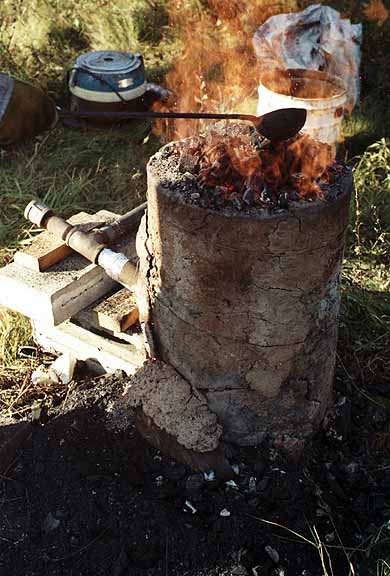
A general feeling was that we should have at least one completed 'currency bar' made up for the L'Anse aux Meadows presentation - that was formed from iron we had smelted ourselves. There was one completed billet of iron on hand. Unfortunately there are some gaps and errors in the records, so not as much information can be gained as was hoped.
INITIAL SMELTING Date : November 12, 2005 (note that earlier records show this as 'October 2005' Experiment :13/D7 (detailed notes on the DARC Iron series) Location : Wareham, ON Team : DARC Furnace: Norse Short Shaft - clay cob with stone slab support - tap arch Note - reuse of furnace from June 05 Size : 25 cm x 60 H Source : suggested by earlier experiments Tuyere : 25 mm ID ceramic kiln support Placement : 16 cm from base - about 5 cm in from wall - angle at 20 down Bellows : vacuum blower Air : 600 l / min (estimated) Charcoal : 79.5 kg broken hardwood Consumption : about 2 kg charcoal every 10 minutes Ore : Stelco taconite + Virginia Rock Ore 17 kg (roasted) Sequence : ore added in variable sequence (7 - 10 min) as small charges .75 - 2.25 lbs Duration : about 6 1/4 hours (not including preheat) Result : 4.3 kg bloom Yield : 22 % Notes : - Successful creation of historic sized bloom - Success in patching and re-firing furnace
BLOOM TO BAR
My notes list an undated effort to forge down a portion of the November 2005 bloom. These seem to indicate the main part of the bloom was cut into two sections, one at 1.70 kg, one at 1.86 kg, the remainder of the mass as smaller fragments. The 1.70 kg piece was forged down into the working bar seen above. The notes list the resulting bar at roughly 2 x 3 by 34 cm, but do not give the finished weight.
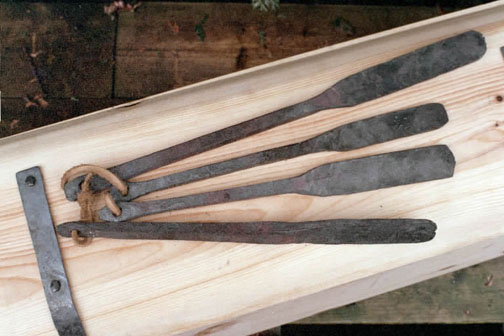
This is the completed currency bar. The finished weight is 895 gms. The size is in the range of the artifact samples : 15 x 15 mm (widest portion 18 x 18) by 525 mm long.
This is a close up of the flattened end of the bar. The 'paddle' is 110 mm long, and roughly 32 mm wide. It tapers slightly from 5mm thick at the base to 3 mm at the tip.
A close up of the bar end. I developed the runic mark seen for use on DARC replica objects. In five strokes it combines all the letters for DARC, both in Roman and Norse characters.
The starting billet could perhaps have used one additional consolidation weld. There is some cracking along the straight corners of the bar as a result. The flattening step held together very well however, a step added in the Viking Age as a quality check. Overall the quality of this bar is in the same range as I found when I created a set of replica bars for Parks Canada, using various antique wrought irons.
Replica Currency Bars - for L'Anse aux Meadows NHSC, 2001
One of the current objects under construction here is a warp weighted loom, commissioned by Karen Peterson. With the living history presentation by DARC at L'Anse aux Meadows NHSC coming up this summer (August 16 - 25, 2010) the entire group is re-working a LOT of our equipments. Everyone in DARC is making a very special effort to make this presentation of the very highest standard. Our normal museum display focuses on a more 'urban' view, centred on the 'life of the craftsman'. The objects are typically chosen from a greater span of both geography and time. For the DARC at Vinland presentation, we are tightening up to 1000 - 1010 AD and to primarily Greenland and Iceland for our prototypes. (An ongoing discussion of how this effects our presentation can be found on the original DARC blog.)
Textile production is a major element in DARC's combined skill set and physical presentations. This is especially the case for the story of LAM, where one of the signature artifacts was a small soapstone spindle whorl. My concern is that the several warp weighted looms currently being used by various members of the group (at least four) are all too 'modern' in their construction details. (Beware: Textile jargon coming up!)
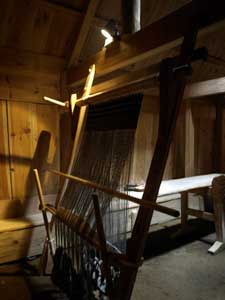
The historic prototypes:
Old Scatness, Scotland Likely 1800's?
National Museum of Iceland Perhaps 1700's?
Stong Farmstead, Iceland Modern reconstruction
Images above by Karen Peterson
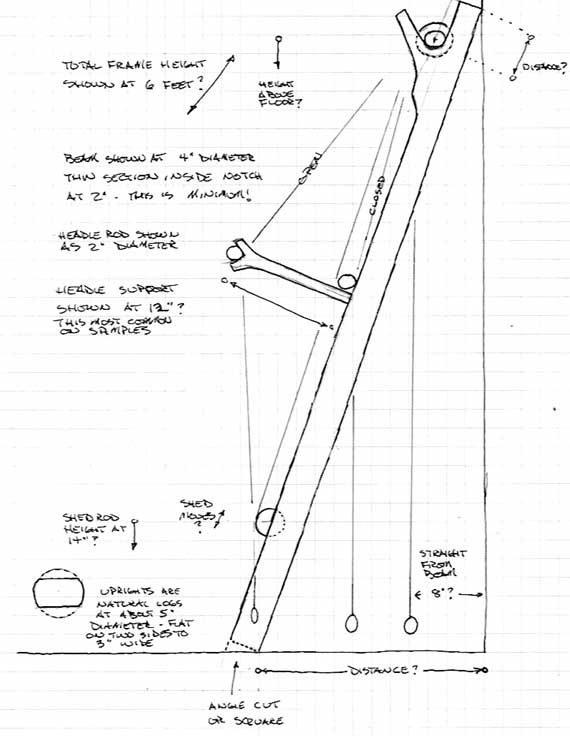
After considerable discussion, it was decided to build a new loom. The key was to not only consider the artifact prototypes available, but also the raw materials available on hand in both Iceland and Vinland circa 1000 AD. One primary problem in looking at the existing samples is that all of them are at best no older than the 1700's. Almost all have been heavily restored. A good number of those on display in museum collections are in fact modern replicas. Our own textile workers have been known to be puzzled by some of those on display. "Well, that just will not work!" is a repeated comment. (Few museum displays are actually set up by involved workers in the related skills, see any of my earlier comments on blacksmithing exhibits.) The primary difference between the more 'continental' style and a distinctively 'Icelandic' style of loom appears to be in the difference in how the heddle bar is supported. (The heddle bar is the horizontal rod to which one set of the up and down warp threads are attached.) The more commonly used method in most re-constructions I have seen uses the form seen on the Old Scatness sample. That is a pair of forked branches or notched boards, which fit into a series of holes running along the uprights. This arrangement allows for adjusting the distance and position of the heddle rod, and thus controls the width of the shed (distance between front and back warp threads). This arrangement is physically quite strong, as the considerable force caused by supporting the loom weights will push straight back down the shed support rods and back into the frame. On the Icelandic pattern, the heddle supports are two longer poles or planks, wedged between the floor and the lower horizontal line of the shed support. The advantage of this method is both ease of construction and that it is almost infinitely adjustable. The major problem is that now the force of the loom weights is directed in a diagonal line against the side of the shafts. In truth, as the major elements of the frame of the loom are virtually identical, it was decided to design the new loom to allow it to be mounted up for either method. There would be the required holes drilled in the uprights and a set of forked shed supports, plus the longer and heavier rods included to set up for the Icelandic tradition.
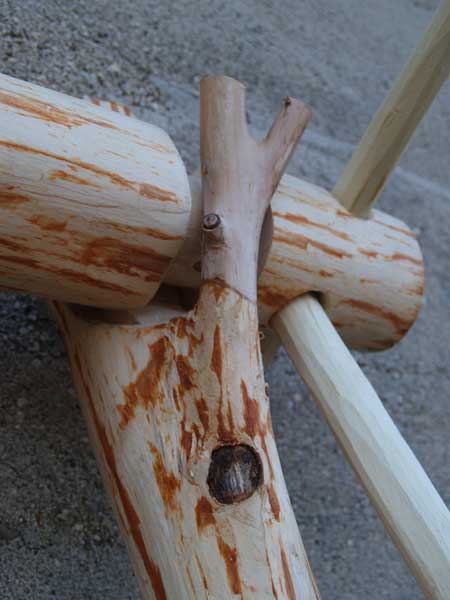
In all the 'artifact' samples, the two uprights have been flattened off on two sides. The supporting fork at the top of the uprights (for the top beam) are made of separate pieces, cut to shape and pinned into place. This is a significantly weaker construction method, as the load runs across the direction of the grain, and all the weight is entirely born by the two pins. A better method is to use two natural limb joints, where the grain will run around the fork and so is significantly stronger. The ideal way to attach these as separate pieces would be to set them into a large dovetail joint. (Readers will note that this is Evil Wood talk : 'I said I don't have much use for them, not that I don't know HOW to use them'.) In the end I decided to use one piece naturally forked limbs to ensure strength but reduce complexity.
The next concern was about materials, and how these might fit into our proposed scenario for DARC at Vinland. Initially it was suggested that 'Ka∂lin' would be a 'professional' weaver, and as such would likely have brought her loom with her on the immigration trip from Iceland. Karen, however, was a bit concerned that this story element might overplay her actual weaving skills. As a compromise, it was decided that the loom she would would work on at LAM would be one that could have been constructed at Vinland itself, perhaps skillfully built (?) but of available local materials. Birch was chosen, as it was available in both Iceland (still) and Vinland circa 1000 AD.
To that end, in mid March I wandered off into a local woodlot (where I have permission to cut). After three hours slogging around in mushy snow and melt water pools, I selected two standing birch trees to fell. This proved much harder than it might seem, I looked a dozens of trees through the swampy area. The key was finding two in the right size range (5 - 6 inch diameter) with naturally occurring forks in the correct configuration. Even cut down to an eight foot length, a six inch green log is damn heavy! I also gathered a standing but long dead (and dry) spruce sapling. This piece is dead straight, and tapers evenly from 3 1/3 inches at the base through to about 3/4 an inch - over a 23 foot length. I ended up making a second trip into the bush later to return to the cutting sites to gather smaller diameter forked branches to use for the shed supports and beam winding shafts.
The first step was removing all the bark. To keep the whole project looking as 'authentic as possible, this work was done using a hand axe. The smaller existing branches would be trimmed back to short lengths, providing a number of natural hooks for eventual hanging of weaving tools. Special attention was given to the method of cutting the ends of the top beam. These ends would be clearly visible. So they were cut more or less flush by using the hand axe and a mallet. This does leave an entirely different finish than slicing off with a modern saw.
YouTube segment showing the preparation of the raw logs.
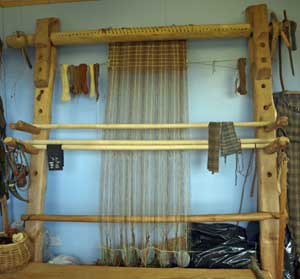
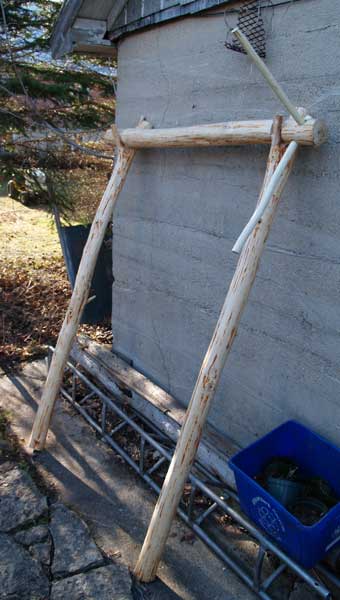
Frame under construction
Detail of beam and upright
The images above show the majority of the loom's frame completed.
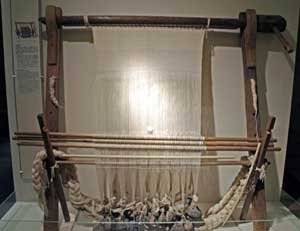
BELOW : The completed loom. You will see it has three positions for the lower shed support. There are a total of 4 positions for the heddle support rods. (You may notice this is the more standard layout, the two longer pole pieces for the Icelandic method will be made up later.)
One of the current objects under construction here is a warp weighted loom, commissioned by Karen Peterson. With the living history presentation by DARC at L'Anse aux Meadows NHSC coming up this summer (August 16 - 25, 2010) the entire group is re-working a LOT of our equipments. Everyone in DARC is making a very special effort to make this presentation of the very highest standard. Our normal museum display focuses on a more 'urban' view, centred on the 'life of the craftsman'. The objects are typically chosen from a greater span of both geography and time. For the DARC at Vinland presentation, we are tightening up to 1000 - 1010 AD and to primarily Greenland and Iceland for our prototypes. (An ongoing discussion of how this effects our presentation can be found on the original DARC blog.)
Textile production is a major element in DARC's combined skill set and physical presentations. This is especially the case for the story of LAM, where one of the signature artifacts was a small soapstone spindle whorl. My concern is that the several warp weighted looms currently being used by various members of the group (at least four) are all too 'modern' in their construction details. (Beware: Textile jargon coming up!)
The historic prototypes:
Old Scatness, Scotland Likely 1800's?
National Museum of Iceland Perhaps 1700's?
Stong Farmstead, Iceland Modern reconstruction
Images above by Karen Peterson
After considerable discussion, it was decided to build a new loom. The key was to not only consider the artifact prototypes available, but also the raw materials available on hand in both Iceland and Vinland circa 1000 AD. One primary problem in looking at the existing samples is that all of them are at best no older than the 1700's. Almost all have been heavily restored. A good number of those on display in museum collections are in fact modern replicas. Our own textile workers have been known to be puzzled by some of those on display. "Well, that just will not work!" is a repeated comment. (Few museum displays are actually set up by involved workers in the related skills, see any of my earlier comments on blacksmithing exhibits.) The primary difference between the more 'continental' style and a distinctively 'Icelandic' style of loom appears to be in the difference in how the heddle bar is supported. (The heddle bar is the horizontal rod to which one set of the up and down warp threads are attached.) The more commonly used method in most re-constructions I have seen uses the form seen on the Old Scatness sample. That is a pair of forked branches or notched boards, which fit into a series of holes running along the uprights. This arrangement allows for adjusting the distance and position of the heddle rod, and thus controls the width of the shed (distance between front and back warp threads). This arrangement is physically quite strong, as the considerable force caused by supporting the loom weights will push straight back down the shed support rods and back into the frame. On the Icelandic pattern, the heddle supports are two longer poles or planks, wedged between the floor and the lower horizontal line of the shed support. The advantage of this method is both ease of construction and that it is almost infinitely adjustable. The major problem is that now the force of the loom weights is directed in a diagonal line against the side of the shafts. In truth, as the major elements of the frame of the loom are virtually identical, it was decided to design the new loom to allow it to be mounted up for either method. There would be the required holes drilled in the uprights and a set of forked shed supports, plus the longer and heavier rods included to set up for the Icelandic tradition.
In all the 'artifact' samples, the two uprights have been flattened off on two sides. The supporting fork at the top of the uprights (for the top beam) are made of separate pieces, cut to shape and pinned into place. This is a significantly weaker construction method, as the load runs across the direction of the grain, and all the weight is entirely born by the two pins. A better method is to use two natural limb joints, where the grain will run around the fork and so is significantly stronger. The ideal way to attach these as separate pieces would be to set them into a large dovetail joint. (Readers will note that this is Evil Wood talk : 'I said I don't have much use for them, not that I don't know HOW to use them'.) In the end I decided to use one piece naturally forked limbs to ensure strength but reduce complexity.
The next concern was about materials, and how these might fit into our proposed scenario for DARC at Vinland. Initially it was suggested that 'Ka∂lin' would be a 'professional' weaver, and as such would likely have brought her loom with her on the immigration trip from Iceland. Karen, however, was a bit concerned that this story element might overplay her actual weaving skills. As a compromise, it was decided that the loom she would would work on at LAM would be one that could have been constructed at Vinland itself, perhaps skillfully built (?) but of available local materials. Birch was chosen, as it was available in both Iceland (still) and Vinland circa 1000 AD.
To that end, in mid March I wandered off into a local woodlot (where I have permission to cut). After three hours slogging around in mushy snow and melt water pools, I selected two standing birch trees to fell. This proved much harder than it might seem, I looked a dozens of trees through the swampy area. The key was finding two in the right size range (5 - 6 inch diameter) with naturally occurring forks in the correct configuration. Even cut down to an eight foot length, a six inch green log is damn heavy! I also gathered a standing but long dead (and dry) spruce sapling. This piece is dead straight, and tapers evenly from 3 1/3 inches at the base through to about 3/4 an inch - over a 23 foot length. I ended up making a second trip into the bush later to return to the cutting sites to gather smaller diameter forked branches to use for the shed supports and beam winding shafts.
The first step was removing all the bark. To keep the whole project looking as 'authentic as possible, this work was done using a hand axe. The smaller existing branches would be trimmed back to short lengths, providing a number of natural hooks for eventual hanging of weaving tools. Special attention was given to the method of cutting the ends of the top beam. These ends would be clearly visible. So they were cut more or less flush by using the hand axe and a mallet. This does leave an entirely different finish than slicing off with a modern saw.
YouTube segment showing the preparation of the raw logs.
Frame under construction
Detail of beam and upright
The images above show the majority of the loom's frame completed.
BELOW : The completed loom. You will see it has three positions for the lower shed support. There are a total of 4 positions for the heddle support rods. (You may notice this is the more standard layout, the two longer pole pieces for the Icelandic method will be made up later.)


 (Darrell)