


This was my third visit to LAM, having previously gone as a tourist in 2006
and as part of the DARC team in 2010. I had already done most of my
"must-see" sightseeing, so this time I was quite content to spend every day
at the site with my friends from Newfoundland and Ontario. Once again, they
were the best part of my experience and I couldn't think of anything I
would rather do than play with them.
My "job" in DARC has evolved into one involving string. On the last visit,
I worked a bit on my fishing net but didn't get very far. It turned out
that the knot I was using slipped (just fine for lacemaking, where I
learned it, but less effective if you want sturdy nets to catch fish).
Ragnarr and Bjorn each taught me their preferred netting knot last time
out. I took great pleasure this time in stringing up the net, having
Ragnarr come over on the first day to inspect my work, and give me a big
smile because I was now doing it right. I was able to do a lot of work on
the net, including repairs to older sections where there were mistakes.
Making a fishing net is a very evocative activity in Newfoundland, where
many of the visitors come from fishing families. They enjoy sharing
memories of repairing nets or watching their dads do so. I love the
personal connection, and seeing how the site goes from being a museum to a
"real" place.
On the way back from LAM, we stopped at the Fortress of Louisbourg, where I
learned something about how to preserve my hemp net and fishing line with
pine pitch. I'll be experimenting, now that I have found a source of pine
pitch (my local tack shop). I also got ideas for other things made of rope,
such as ladders, monkey fists, and boat bumpers, and will be researching
evidence of their use in the Viking Age.
Most of my other string experiments this time were with slyng
(whipcording). I made some cord using two colours of wool I had dyed and
spun. Eventually, it will be used for straps or decorative trim.
I also used slyng to make a hemp bowstring with Jorunn. We started the
braid a few inches down our cords, then looped the top and spliced the
loose ends into the slyng. This gave a very sturdy loop for the top of the
bowstring. The bottom end was simply finished with a thin cord whipping,
and tied to the bow with a bowyer's knot (timber hitch). The bowstring was
round and just the right size for the arrow nocks, although it doesn't have
much spring. It was fun to contribute to the site by leaving an artefact
behind.
Based on the bowstring experience I have decided that my next attempt at a
horsehair fishing line will involve slyng. Historically, fishing lines were
often made of horsehair, which is both strong and long-lasting. I tried
various ways of making a fishing line while at LAM. There is evidence of
twisted horsehair fishing lines date from around the 1400's, and the short
sections of line were somehow knotted together. Remember, about 30 feet of
line is needed, and good horse tails are rarely much longer than about 25
inches. My first attempt with twisted line was a complete failure. The line
was just too slippery to be knotted or hold a splice. The next attempt,
joining short lines made from plain three-strand braids was equally
impossible. Since simple knots didn't work, I tried making a loop and
splicing the end bits into my braid. Although splicing a loop worked
somewhat better, spliced loops could only be used on one end of the line
(loosening the braid and stuffing the ends in didn't work) . I still needed
to knot the other end. Splicing a continuous braid might be a little
sturdier, but a slyng braid is much tighter than a three-strand braid, so
that's what I will be trying next.
The other thing that I enjoyed at LAM was doing the hair of my friends each
day. It wasn't exactly rope, but it did involve lots of braiding. I
experimented with different braids, found ways to disguise modern
hairstyles, and provided another connection point for visitors to relate
their daily lives to those of the Viking Age Norse.
Diane, aka Auðr
Sunday, October 28, 2012
Wednesday, October 10, 2012
"Bottle" Bead Furnace
For a number of reasons, Neil Peterson and I decided not to
mount an iron smelt over Thanksgiving weekend, but concentrated on the
VA glass bead making furnace research instead.
The initial experiments in this area were framed by the existing clay 'based plates' found at Ribe Denmark. It should be noted that although there is evidence of glass bead production at a couple of Norse trade / urban sites, there has not been a single complete furnace found. Experimental furnaces we have constructed using these artifact footprints have never been truly effective for actually making beads. There may be some other purpose for the clay slabs (?)
There were a number of continuing problems with the large oval furnaces, as suggested by the artifact bases :

1) Very short effective temperature cycles - in the range of 10 minutes
2) Side ports proved very difficult to work inside - limited space and heat onto hands
3) Top ports proved less than ideal - too large an area for effective control of glass
4) Continuing problems with ash coating surface of beads
5) Large internal volume required considerable charcoal expenditures to operate
6) The top ports were quite effected by any cross winds (operated outside)
Taking my experience with charcoal forge fires, and what we have learned from the much larger charcoal fired iron smelting furnaces, I had suggested this as a possible effective layout:


We tried out a couple of early versions of this system, back in 2009. These were abandoned, mainly because they do not conform to the known artifact 'bases'.
The concept here is that all the exhaust gasses are bottled up and forced out of a top vent hole, which in effect creates a working space much like a more modern torch flame.
Returning to this operating system, Neil constructed a new prototype, based some new observations and suggestions from me, back in mid September. This furnace had been air drying for several weeks. Sunday's workshop saw it fired and operated through several charging cycles:
There was no doubt that this new furnace was a massive improvement:
1) Effective operating cycle in the range of 75 minutes (!)
2) Higher working temperatures at the upper port
3) Narrow flame created more effective control of the glass itself
4) Ash greatly reduced (mostly absent)
5) Significantly lower charcoal consumption
6) 'Time per bead' rate greatly reduced
This all creates one of the classic problems in experimental archaeology : 'If you can't get the same results, you can't be doing the same thing they did' vs 'That certainly works - but it does not match the available artifact evidence'.
In the actual absence of any complete furnaces (or even upper fragments) from VA sites, my gut feeling is that the few surviving 'bases' may be from some other process entirely. Annealing pans is one possibility.
Our research and experimentation continues...
(duplicated from 'Hammered Out Bits')
The initial experiments in this area were framed by the existing clay 'based plates' found at Ribe Denmark. It should be noted that although there is evidence of glass bead production at a couple of Norse trade / urban sites, there has not been a single complete furnace found. Experimental furnaces we have constructed using these artifact footprints have never been truly effective for actually making beads. There may be some other purpose for the clay slabs (?)
There were a number of continuing problems with the large oval furnaces, as suggested by the artifact bases :
1) Very short effective temperature cycles - in the range of 10 minutes
2) Side ports proved very difficult to work inside - limited space and heat onto hands
3) Top ports proved less than ideal - too large an area for effective control of glass
4) Continuing problems with ash coating surface of beads
5) Large internal volume required considerable charcoal expenditures to operate
6) The top ports were quite effected by any cross winds (operated outside)
Taking my experience with charcoal forge fires, and what we have learned from the much larger charcoal fired iron smelting furnaces, I had suggested this as a possible effective layout:
We tried out a couple of early versions of this system, back in 2009. These were abandoned, mainly because they do not conform to the known artifact 'bases'.
The concept here is that all the exhaust gasses are bottled up and forced out of a top vent hole, which in effect creates a working space much like a more modern torch flame.
Returning to this operating system, Neil constructed a new prototype, based some new observations and suggestions from me, back in mid September. This furnace had been air drying for several weeks. Sunday's workshop saw it fired and operated through several charging cycles:
 |
| Layout of the Furnace : about 30 cm OD. Annealing pot to left. |
 |
| Lid removed, filling with charcoal. Electric blower used for this test series. |
 |
| Fresh charcoal vents off combustible gasses for about 5 minutes. |
 |
| Stable working flame, working a simple glass bead in the 'stack' |
 |
| End of a working cycle, charcoal has burned away from centre to base. |
1) Effective operating cycle in the range of 75 minutes (!)
2) Higher working temperatures at the upper port
3) Narrow flame created more effective control of the glass itself
4) Ash greatly reduced (mostly absent)
5) Significantly lower charcoal consumption
6) 'Time per bead' rate greatly reduced
This all creates one of the classic problems in experimental archaeology : 'If you can't get the same results, you can't be doing the same thing they did' vs 'That certainly works - but it does not match the available artifact evidence'.
In the actual absence of any complete furnaces (or even upper fragments) from VA sites, my gut feeling is that the few surviving 'bases' may be from some other process entirely. Annealing pans is one possibility.
Our research and experimentation continues...
(duplicated from 'Hammered Out Bits')
Friday, October 5, 2012
Bead Furnace at Bonfield
(Cross posted from Hammered Out Bits )
These images are all by Vandy Simpson, taken at the Bonfield Battle event run each Labour Day by my old friend Steve Muhlberger.
As a continuation of the ongoing experimental research under Neil Peterson, DARC mounted a combination demonstration and hands on session with a possible Viking Age bead working furnace. The furnaces are clay & horse manure construction, fire charcoal, and are based on 'possible' footprints suggested by the archaeology primarily from Ribe Denmark. For a more complete background, see Neil's published research.
Two primary problems are plaguing us with this specific design, which is based on the size of one of the uncovered 'base plates' :
1) Although high enough temperatures can be produced to effectively work the glass, the actual effective time is quite short. Our skill levels are mid level at best, and typically only one semi complex (base plus two colour patterning) can be created in one charcoal fill cycle.
2) Marred surfaces, from flying ash and small particles of burning charcoal are common, almost universal. Artifact beads do not show these effects as common. This strongly suggests we are doing something 'wrong'.
Our next prototype furnace is abandoning the profiles suggested by the artifact bases. Instead I have suggested a design based more on the dynamics of burning charcoal, gathered from experience working with charcoal forges. The concept is to contain the hot gasses to produce an effect more like a torch - then work inside that blast. (An earlier post describes this system.)
There will be a workshop this weekend at Wareham where a few of us will be working with a new prototype. Hopefully there will be a field report with some images later in the week describing the results...
These images are all by Vandy Simpson, taken at the Bonfield Battle event run each Labour Day by my old friend Steve Muhlberger.
As a continuation of the ongoing experimental research under Neil Peterson, DARC mounted a combination demonstration and hands on session with a possible Viking Age bead working furnace. The furnaces are clay & horse manure construction, fire charcoal, and are based on 'possible' footprints suggested by the archaeology primarily from Ribe Denmark. For a more complete background, see Neil's published research.
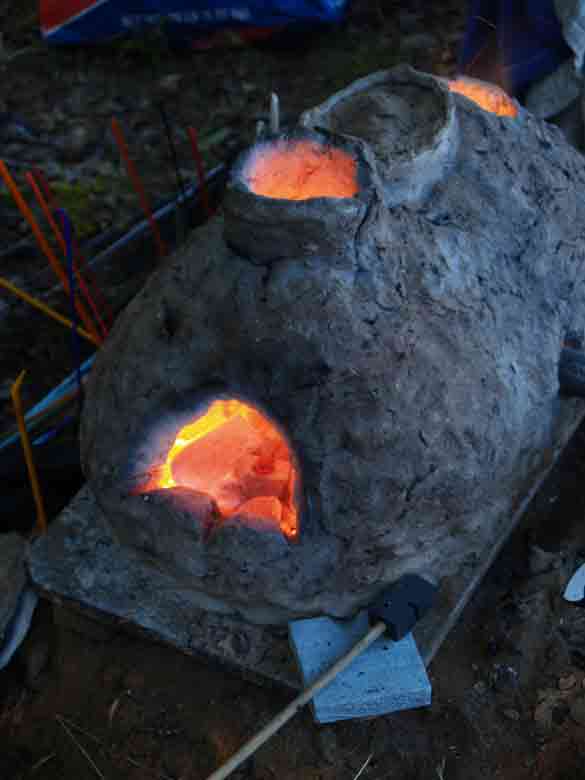
 |
| Overall view of the set up - inside the 'forge' duggout area |
 |
| Working in the stack, heating new rod to apply decoration |
 |
| Streaks are small pieces of burning charcoal in the vent |
Two primary problems are plaguing us with this specific design, which is based on the size of one of the uncovered 'base plates' :
1) Although high enough temperatures can be produced to effectively work the glass, the actual effective time is quite short. Our skill levels are mid level at best, and typically only one semi complex (base plus two colour patterning) can be created in one charcoal fill cycle.
2) Marred surfaces, from flying ash and small particles of burning charcoal are common, almost universal. Artifact beads do not show these effects as common. This strongly suggests we are doing something 'wrong'.
Our next prototype furnace is abandoning the profiles suggested by the artifact bases. Instead I have suggested a design based more on the dynamics of burning charcoal, gathered from experience working with charcoal forges. The concept is to contain the hot gasses to produce an effect more like a torch - then work inside that blast. (An earlier post describes this system.)
There will be a workshop this weekend at Wareham where a few of us will be working with a new prototype. Hopefully there will be a field report with some images later in the week describing the results...
Subscribe to:
Posts (Atom)